Eugenia allows to create a GMF editor through a simple script. This script is called "Emfatic Source". It can be generated selecting the metamodel -> right click -> Generate Emfatic Source.
For instance, based on the next metamodel, it is posible to define basic graphical components for each concept in the metamodel. Eugenia GMF Tutorial has information about these components
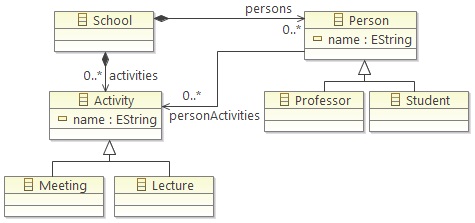
In this case, the Emfatic Source school.emf was created and next script has been done to set a rounded rectangle for Professor and Student, and a rectangle for Meeting and Lecture.
@namespace(uri="school", prefix="school")
package school;

@gmf.diagram(model.extension="school")
class School {
  val Person[*] persons;
  val Activity[*] activities;
}

class Person {
  attr String name;
  @gmf.link(target.decoration="arrow", source.decoration="none", style="dash", color="0,0,0")
  ref Activity[*] personActivities;
}

@gmf.node(figure="rounded", label.icon="false", label="name", label.pattern="{0}", size="100,60")
class Professor extends Person {
}

@gmf.node(figure="rounded", label.icon="false", label="name", label.pattern="{0}", size="100,60")
class Student extends Person {
}

class Activity {
  attr String name;
}

@gmf.node(figure="rectangle", label.icon="false", label="name", label.pattern="{0}", size="100,60")
class Meeting extends Activity {
}

@gmf.node(figure="rectangle", label.icon="false", label="name", label.pattern="{0}", size="100,60")
class Lecture extends Activity {
}
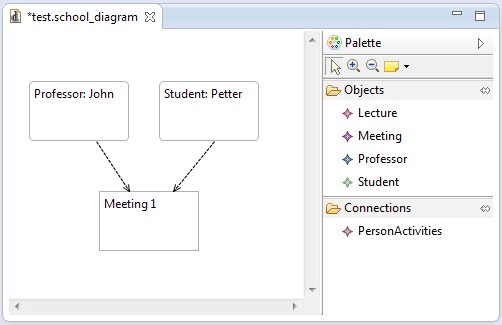
Next editor is generated by selecting the Emfatic Source (in this case school.emf) -> right click -> Eugenia -> Generate GMF Editor
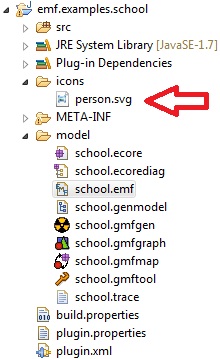
In addition, if you want to use a customized graphical component, you must to define the path of the graphical component using the attribute "figure". This component must be SVG, so the attribute "svg.uri" must be added. Next script has the modifications for the concept Student
@gmf.node(figure="svg", svg.uri="platform:/plugin/emf.examples.school/icons/person.svg", label.icon="false", label="name", label.pattern="{0}", size="100,60")
class Student extends Person {
}
This function requires GMF SDK Experimental, which is a component of GMF Tooling.
Also, for this example, the svg file must be located in the folder icons. This folder must be created as well.
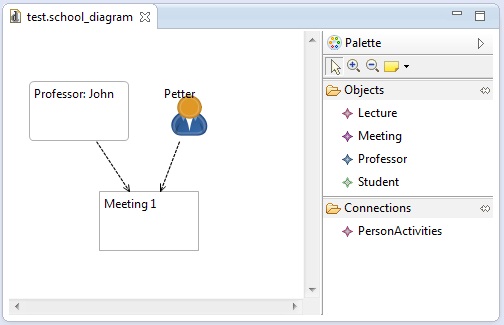
The new editor is:
Moreover, icons in the palette can be changed. For this example, new icons (with extension gif) must be located in the folder emf.examples.school.edit\icons\full\obj16 (This project is generated). Also, the icon can be showed in the component label modifying label.icon="true". Next script has the changes for the concept Meeting.
@gmf.node(figure="rectangle", label.icon="true", label="name", label.pattern="{0}", size="100,60")
class Meeting extends Activity {
}
The new editor is:

Finally, if you need to modify the palette, it is necessary to create an EOL script named ECore2GMF.eol in the same folder than the emfatic file. In this example, the file ECore2GMF.eol has been created in the folder model.
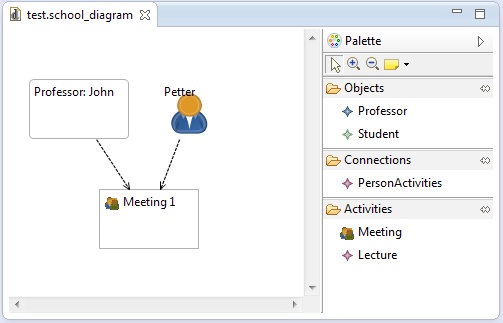
Next script creates a new tool group named Activities. Also, the concepts Meeting and Lecture are moved into this tool group.
var palette := GmfTool!Palette.all.first();

var toolGroupActivities= new GmfTool!ToolGroup;
toolGroupActivities.title := 'Activities';
toolGroupActivities.collapsible := true;
palette.tools.add(toolGroupActivities);

var toolGroupObjects = GmfTool!ToolGroup.all.selectOne(r|r.title = 'Objects');
var toolGroupConnections = GmfTool!ToolGroup.all.selectOne(r|r.title = 'Connections');

var toolEntry;
toolEntry = toolGroupObjects.tools.selectOne(r|r.title = 'Meeting');
toolGroupActivities.tools.add(toolEntry);

toolEntry = toolGroupObjects.tools.selectOne(r|r.title = 'Lecture');
toolGroupActivities.tools.add(toolEntry);
The new editor is:
I was trying to change the palette, unsuccessfully, and this was really helpful. Thank you!
ReplyDeleteI am glad for this has been useful for you.
DeleteGreat, I needed a way to change the tools icons, and it works perfectly! Thank you.
ReplyDeleteExcellent.. :)
Delete